[2021.07.27] 인턴 +148 HTML Image - 8
HTML Image
-> <img>태그는 <img>만 존재하며, </img>는 없다.
* <img>태그는 2개의 필수 속성이 존재 (src,alt)
- src : 이미지의 경로를 지정(link)
- alt : 이미지의 대체 텍스트를 지정(브라우저 사항이 좋지 않아, 이미지가 안떴을 때 지정한 text로 나옴)
<img src="img_girl.jpg" alt="Girl in a jacket" style="width:500px;height:600px;">
이미지 너비 와 높이
<img src="img_girl.jpg" alt="Girl in a jacket" style="width:500px;height:600px;">
<!DOCTYPE html>
<html>
<body>

<h2>HTML Image</h2>
<img src="img_chania.jpg" alt="Flowers in Chania" width="460" height="345">

</body>
</html>
<출력 화면>

----------------------------------------------------------------------------------------------------------------------------
이미지 너비와 높이<style> 속성 사용
<style>
img {
width: 50%;
}
<!DOCTYPE html>
<html>
<head>
<style>
img {
  width: 50%;
}
</style>
</head>
<body>

<br>
<br>
<br>
<br>
<br>
<img src="html5.gif" alt="HTML5 Icon" width="200px" height="250px">


<br>
<br>
<br>
<br>
<br>
<br>
<img src="html5.gif" alt="HTML5 Icon" style="width:128px;height:128px;">

</body>
</html>
<출력 화면>

-----------------------------------------------------------------------------------------------------------------------------------
Floating Images
<img src="smiley.gif" alt="Smiley face" style="float:right;width:59px;height:80px;">
* img src에 style속성을 사용하여, style="float:left || right;">를 주면 됨
<!DOCTYPE html>
<html>
<body>

<h1>Floating Images</h1>


<p><h3>Float the image to the right:</h3></p>
<p>
<a href="https://injekim97.tistory.com/" target=_blank> <img src="smiley.gif" alt="Smiley face" style="float:right;width:59px;height:80px;"></a>
</p>


<br>
<br>
<br>


<p><h3>Float the image to the left:</h3></p>
<p>
<a href="https://www.google.com/search?q=html+target+_self&oq=html+target+_self&aqs=chrome..69i57j0l8.5956j0j7&sourceid=chrome&ie=UTF-8" target=_blank> <img src="/images/branding/googlelogo/2x/googlelogo_color_272x92dp.png" alt="Google Search" style="float:left;width:30px;height:40px;"></a>
</p>


</body>
</html>
<출력 화면>

-> img에 링크를 걸고 싶으면 바로 <a href ="link"> </a>로 감싸주면 됨
-> 또한, 특정 사이트에서 이미지를 가져오려면, img src="image_link" 를 주면 됨
------------------------------------------------------------------------------------------------------------------------
다른 폴더에 PATH 추가하여 사용가능(src)
<img src="/images/html5.gif" alt="HTML5 Icon" style="width:128px;height:128px;">
다른 서버/웹 사이트 링크 이미지 사용 가능(src)
<img src="https://www.w3schools.com/images/w3schools_green.jpg" alt="W3Schools.com">
HTML 5 Animated Images
-> .gif 사용가능
<img src="programming.gif" alt="Computer Man" style="width:48px;height:48px;">
-----------------------------------------------------------------------------------------------------------------------------
HTML Image <Maps> 부분 패스
https://www.w3schools.com/html/html_images_imagemap.asp
HTML Image Maps
HTML Image Maps With HTML image maps, you can create clickable areas on an image. Image Maps The HTML tag defines an image map. An image map is an image with clickable areas. The areas are defined with one or more tags. Try to click on the computer, phone,
www.w3schools.com
-> 해당 링크에 들어가면 잘 설명되어 있음
-----------------------------------------------------------------------------------------------------------------------------
HTML Background Images (배경 이미지 넣는 방법)
1. HTML style 속성
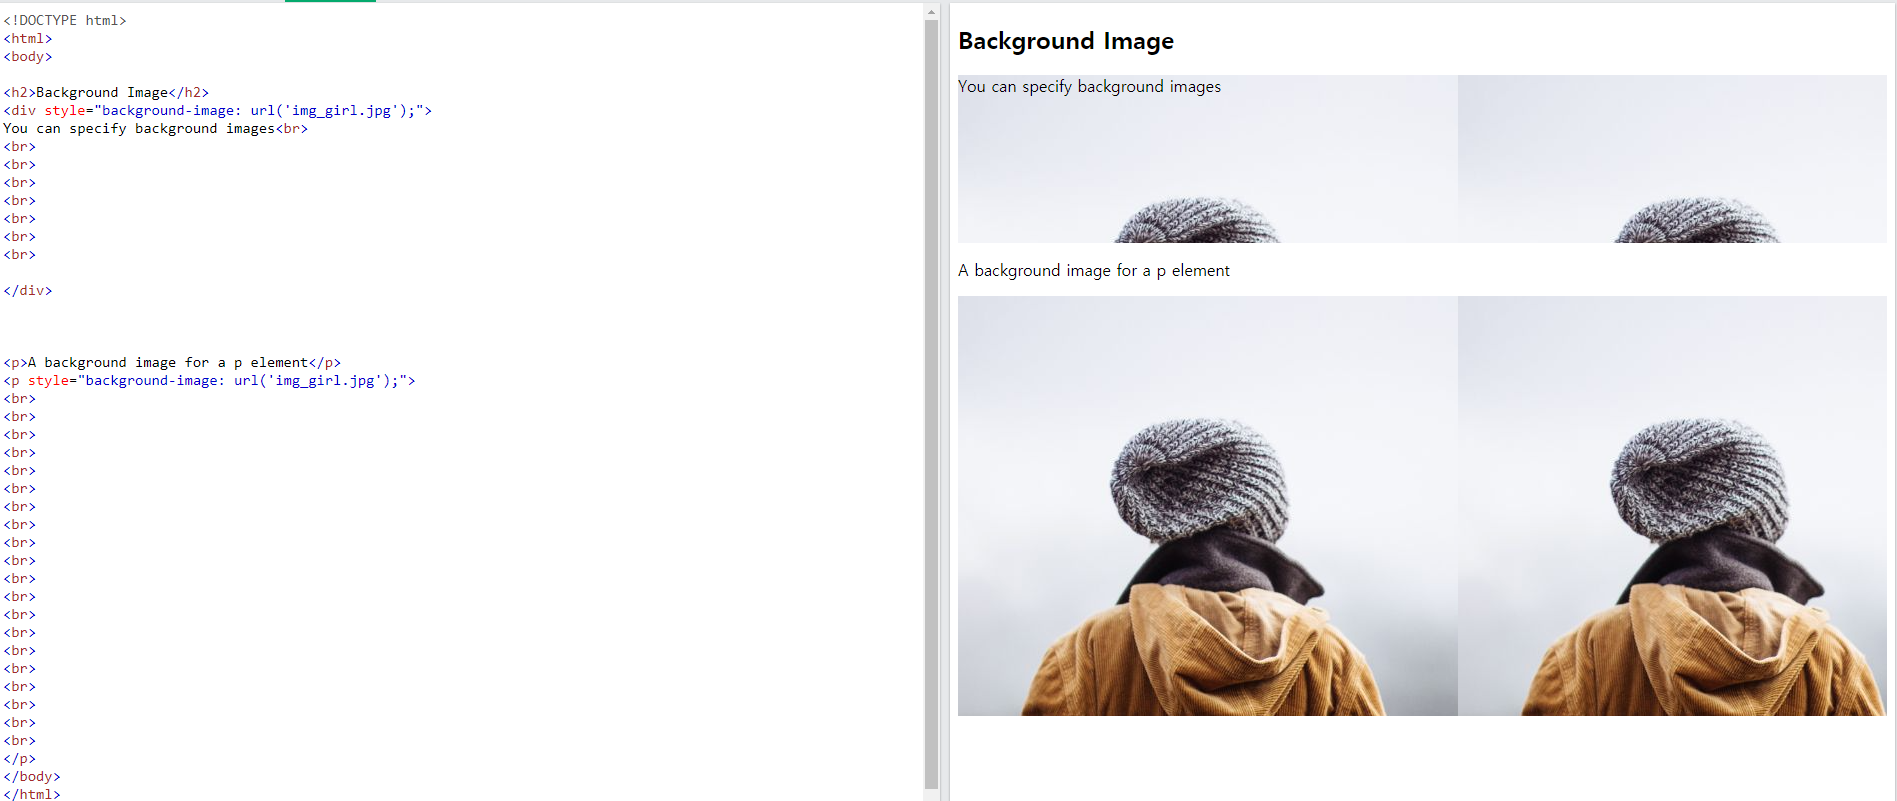
<div style="background-image: url('img_girl.jpg');">
<!DOCTYPE html>
<html>
<body>

<h2>Background Image</h2>
<div style="background-image: url('img_girl.jpg');">
You can specify background images<br>
<br>
<br>
<br>
<br>
<br>
<br>
<br>

</div>


<p>A background image for a p element</p>
<p style="background-image: url('img_girl.jpg');">
<br>
<br>
<br>
<br>
<br>
<br>
<br>
<br>
<br>
<br>
<br>
<br>
<br>
<br>
<br>
<br>
<br>
<br>
<br>
<br>
</p>
</body>
</html>
<출력 결과>

-> <br>태그로, 이미지 크기가 커짐
-------------------------------------------------------------------------------------------------------------------------------
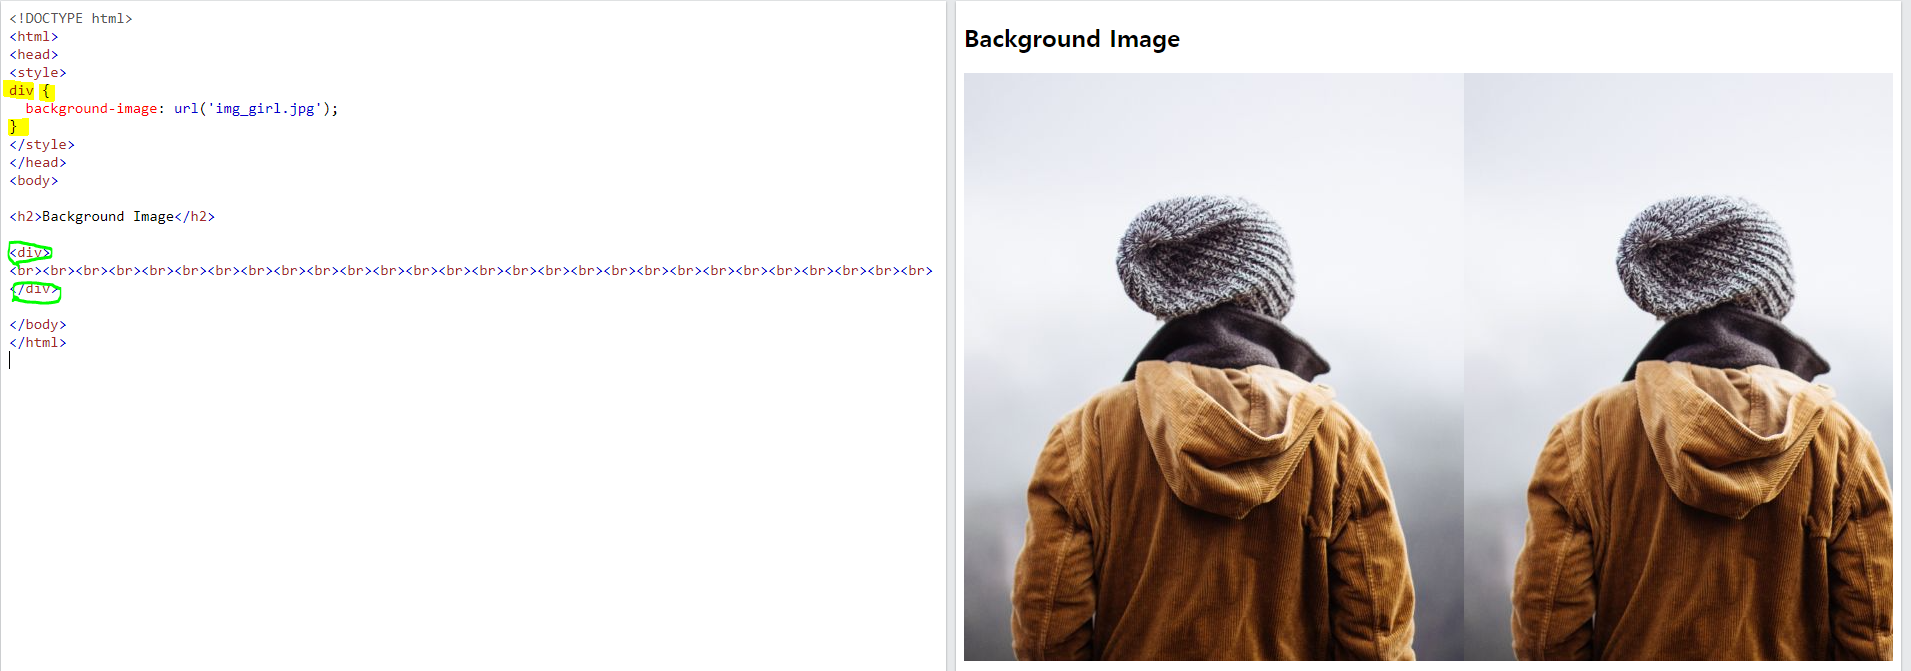
2. CSS background-image
<style>
div {
background-image: url('img_girl.jpg');
}
</style>
<!DOCTYPE html>
<html>
<head>
<style>
div {
  background-image: url('img_girl.jpg');
}
</style>
</head>
<body>

<h2>Background Image</h2>

<div>
<br><br><br><br><br><br><br><br><br><br><br><br><br><br><br><br><br><br><br><br><br><br><br><br><br><br><br><br>
</div>

</body>
</html>
<출력 결과>

-----------------------------------------------------------------------------------------------------------------------------------
페이지의 배경 이미지 설정 방법
<style>
body {
background-image: url('img_girl.jpg');
}
</style>
</head>
<body>
</body>
<!DOCTYPE html>
<html>
<head>
<style>
body {
  background-image: url('img_girl.jpg');
}
</style>
</head>
<body>

</body>
</html>
<출력 결과>

--------------------------------------------------------------------------------------------------------------------------------
배경 이미지 반복(Background Repeat)
1. 해당 코드는 이미지가 반복되어서 나옴
<!DOCTYPE html>
<html>
<head>
<style>
body {
  background-image: url('example_img_girl.jpg');
}
</style>
</head>
<body>
</body>
</html>
<!DOCTYPE html>
<html>
<head>
<style>
body {
background-image: url('example_img_girl.jpg');
}
</style>
</head>
<body>
</body>
</html>
<출력 결과>

2. 해당 코드는 이미지가 반복X
-> background-repeat: no-repeat; 추가해주면 됨
<!DOCTYPE html>
<html>
<head>
<style>
body {
background-image: url('example_img_girl.jpg');
background-repeat: no-repeat;
}
</style>
</head>
<body>
</body>
</html>
<출력 결과>

----------------------------------------------------------------------------------------------------------------------------------
배경 표지(Background Cover)
* background-attachment: fixed;
-> 전체 요소가 항상 포함 되도록
* background-size: cover;
-> 해당 기능이 없으면, 한페이지 내에 이미지가 꽉 차보이지 않음
* background-size: 100% 100%;
-> cover 대신에, width ,height에 %를 사용해서 크기 조절 가능
<!DOCTYPE html>
<html>
<head>
<style>
body {
  background-image: url('img_girl.jpg');
  background-repeat: no-repeat;
  background-attachment: fixed;
  background-size: cover;
}
</style>
</head>
<body>
</body>
</html>
<출력 결과>

--------------------------------------------------------------------------------------------------------------------------------
★★★ HTML <picture> Element ★★★
-> 다양한 장치에 대해 자동적으로 화면 크기 조정
<picture>
<source media="(min-width: 650px)" srcset="img_food.jpg">
<source media="(min-width: 465px)" srcset="img_car.jpg">
<img src="img_girl.jpg">
</picture>
<!DOCTYPE html>
<html>
<head>
<meta name="viewport" content="width=device-width, initial-scale=1.0">
</head>
<body>

<h2>The picture Element</h2>

<picture>
  <source media="(min-width: 650px)" srcset="img_food.jpg">
  <source media="(min-width: 465px)" srcset="img_car.jpg">
  <img src="img_girl.jpg" style="width:auto;">
</picture>


</body>
</html>
<출력 결과>

----------------------------------------------------------------------------------------------------------------------------------
<picture>요소 에는 2가지가 존재
1. Bandwidth(대역폭)
-> 화면이 작은 장치인 경우, <source> 속성 값이 일치하는 첫 번째 요소 사용
2. Format Support
-> 일부 브라우저나 장치엔 이미지 지원 하지 못 할수도 있음
-> 그럴땐 alt로 로딩 못한 이미지에 text로 출력해줌
<!DOCTYPE html>
<html>
<head>
<meta name="viewport" content="width=device-width, initial-scale=1.0">
</head>
<body>

<h2>The picture Element</h2>

<picture>
  <source srcset="img_avatar.png">
  <source srcset="img_girl.jpg">
  <img src="img_beatles.gif" alt="Beatles" style="width:auto;">
</picture>
</body>
</html>
<출력 결과>

'Web' 카테고리의 다른 글
| [2021.07.28] 인턴 +149 HTML List(리스트) - 10 (0) | 2021.07.28 |
|---|---|
| [2021.07.27] 인턴 +148 HTML Tables(테이블) - 9 (0) | 2021.07.27 |
| [2021.07.27] 인턴 +148 HTML Link - 7 (1) | 2021.07.27 |
| [2021.07.27] 인턴 +148 HTML Styles(CSS) - 6 (0) | 2021.07.27 |
| [2021.07.26] 인턴 +147 HTML Comment Tags & HTML Colors(Colors, RGB, HEX, HSL) - 5 (0) | 2021.07.26 |


댓글